
Exploring DataVault4dbt
Last year Scalefree released DataVault4dbt, a Data Vault 2.0 open-source package for dbt, which includes loading templates for creating and Data Vault 2.0 modeling entities following up-to-date standards and best practices. If you want to read more about the general content of the package and its motivation, you can do so here.
We’re excited to launch a series of insightful posts and webinars, showcasing practical implementations of DataVault4dbt. This will empower you to leverage its full potential in your data warehousing endeavors. Today, we’ll spotlight its application in the staging layer.
Before we start with DataVault4dbt
We will assume some previous knowledge related to Data Vault 2.0 and dbt. Besides, for the following examples, we will be using dbt Cloud IDE connected to Snowflake. For an updated list of supported platforms, check the package’s GitHub repository.
Also, bear in mind that for optimal use of the macros, you must meet a couple of prerequisites:
- Flat & Wide source data, accessible in your target database
- A Load Date column signifying the time of arrival in the source data storage
- A Record Source column detailing the origin of the source data, such as the file location within a Data Lake
In our case, we used and adapted the data from the jaffle_shop example project available on dbt.
Installing DataVault4dbt package on dbt
Installing DataVault4dbt is like installing any other package on your project. You will need to follow two simple steps:
1.Add it to your packages.yml file

2. Run dbt deps

Using the macro for staging our source data
According to the documentation for the staging layer of DataVault4dbt, this layer primarily focuses on hashing. It also offers functionalities like creating derived columns, conducting prejoins, and adding NULL values for missing columns. Rather than diving deep into the technical aspects of each macro component, which are comprehensively covered in the documentation, let’s dive straight into its application!
A. Basic source information
Identifying the Source Model (source_model):
- When referencing a source, adopt the dictionary format: ‘source_name’: ‘source_table’.
- For models within our dbt project, just use the model name: ‘source_table’.
Setting Load Date Timestamp (ldts) & Record Source (rsrc):
- Both can reference a column from the source table or a more detailed SQL expression.
- Additionally, for the Record Source, you can use a static string beginning with ‘!’, like ‘!my_source’.
Example

- source_model: Calls an already created table on dbt named ‘orders_example’.
- ldts: Calls a timestamp column from our source model.
- rsrc: Calls a column which contains a string referring to our record source name.
B. Hashing
In DataVault4dbt, the hashed_columns parameter outlines how to generate hashkeys and hashdiffs. For each hash column:
- The key represents the hash column’s name.
- For Hashkeys, the value is a list of business keys.
- For Hashdiffs, the value will usually be a list of descriptive attributes.
Example
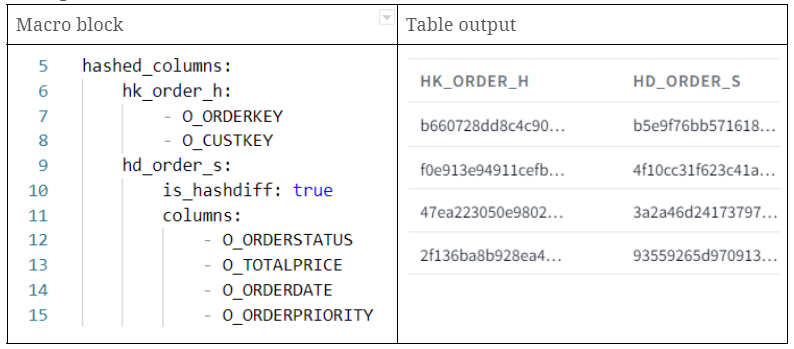
- hk_order_h: hashkey generated using two columns inputs (O_ORDERKEY and O_CUSTKEY)
- hd_order_s: hashdiff generated using multiple descriptive attributes
C. Derived columns
Derived Columns in DataVault4dbt stage models allow users to directly apply specific transformations to data. They act as on-the-fly customizations, enabling immediate adjustments to data within the column itself. Essentially, if data isn’t in the desired format, with DataVault4dbt you can derive a new version right within the column using a specified rule.
When setting the derived_columns parameter, each derived column includes:
- value: The transformation expression.
- datatype: The datatype of the column.
- src_cols_required: Source columns needed for the transformation.
Depending on how you name the derived column and the source columns, you can achieve two outcomes:
- If the derived column’s name matches its source column’s name, the original column’s data will be replaced by the transformed data. This effectively means you’re overwriting the original data.
- On the other hand, if the derived column’s name is different from its source column’s name, the transformation will result in a brand new column, preserving the original column’s data.
Example
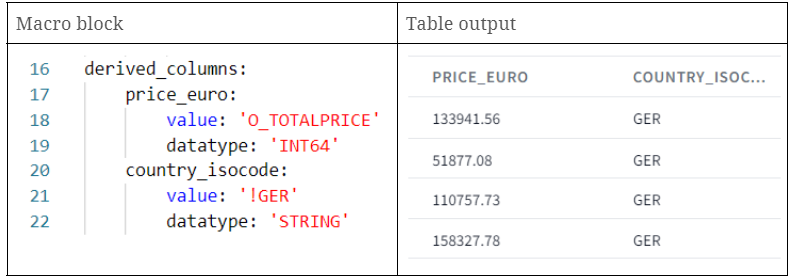
- price_euro: creation of a new column with the same values as the O_TOTALPRICE column.
- country_isocode: creation of a new column with a static string ‘GER’.
D. Prejoining
Why Prejoin?
In certain scenarios, your source data might not have the ‘Business Key’ which is often a human-readable identifier, such as an email address or username. Instead, it might have a ‘Technical Key’, which could be an internally generated identifier or code. If you need to use the human-readable Business Key in your processing but only have the Technical Key, you would use prejoining to combine your data with another table that maps Technical Keys to Business Keys.
How to Define Prejoins in DataVault4dbt?
The DataVault4dbt package provides a structured way to define these prejoins (prejoined_columns) using dictionaries.
For every column you’re adding through prejoining, you need to specify a few things:
- src_name: This is the source of the prejoined data, as defined in a .yml file.
- src_table: This specifies which table you’re prejoining with, as named in the .yml file.
- bk: This is the name of the Business Key column in the prejoined table or the column values you are bringing to your table.
- this_column_name: In your original data, this is the column that matches up with the prejoined table. This is often a Technical Key.
- ref_column_name: In the prejoined table, this is the column that this_column_name points to. It should match up with the values in this_column_name.
Note that both ‘this_column_name’ and ‘ref_column_name’ can represent either a single column or a list of columns, serving as the basis for constructing the JOIN conditions.
Example
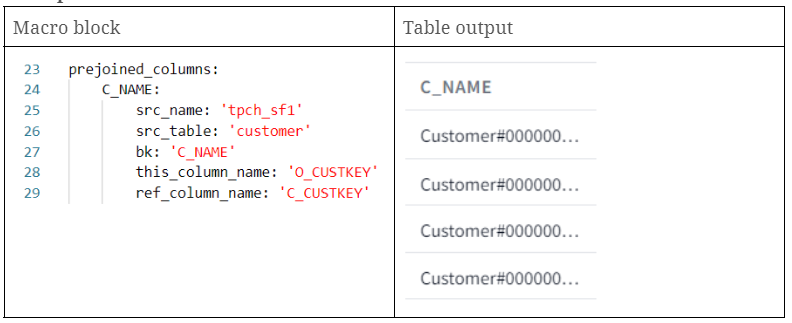
- c_name: we brought the column “C_NAME” from the customer source table, joining on orders.o_custkey = customer.c_custkey.
E. Multi active config
The multi_active_config parameter is used when dealing with source data that contains multiple active records for the same Business Key. Essentially, you need to specify which columns are the multi-active keys and the primary hashkey column.
If your source data doesn’t have a natural multi-active key column, you should create one using functions like row_number in a preceding layer. Then, add the name of this newly created column to the multi-active-key parameter. It’s crucial that the combination of multi-active keys, the main hashkey, and the ldts column be unique in the final satellite output. If you don’t use this setting, the stage is considered to have only single active records.
Example
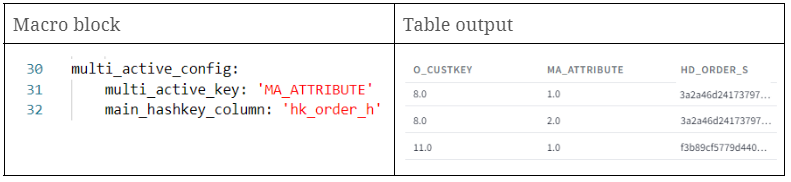
By setting this parameter, we’ll observe consistent hashdiffs for identical Business Keys, proving beneficial in subsequent layers. If you want to know why, you can check this post.
F. Missing columns
With DataVault4dbt, the missing_columns parameter helps handle scenarios where the source schema changes and some columns no longer exist. Using this parameter, you can create placeholder columns filled with NULL values to replace the missing ones. This ensures that hashdiff calculations and satellite payloads continue to work. Essentially, you provide a dictionary where the column names are the keys and their respective SQL datatypes are the values.
Example
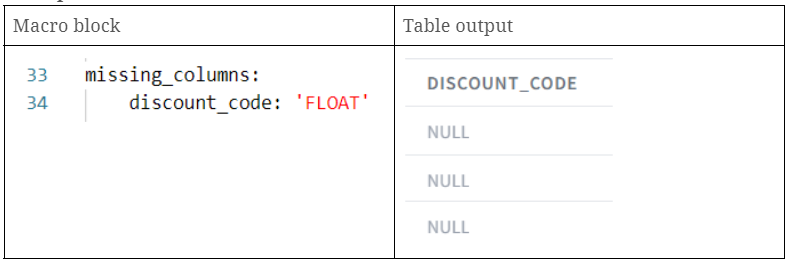
- discount_code: creation of a new discount_code column with NULL values.
Conclusion
Scalefree’s DataVault4dbt package introduces an easy-to-use yet powerful solution for database modeling. In our case, we went through the staging layer macro, which combines best practices with the flexibility to address diverse source data needs. From hashing to on-the-fly column modifications, this Data Vault 2.0 open-source package for dbt streamlines complex processes.
As we continue to explore its potential, we invite you to join our monthly expert session for a deeper dive. Reserve your spot here and stay tuned to the package’s GitHub repository for the latest updates and support.
