
search
0

Know Your Data: Making Data Ownership Work for You

Introduction: The Critical Role of Data Ownership

In today’s rapidly evolving business landscape, managing data effectively is paramount. With increasing regulatory pressures, digital transformation, and a growing reliance on data-driven decision making, clear and defined data ownership becomes a strategic imperative. Without it, organizations risk ambiguity, poor data quality, and non-compliance. This article explores why data ownership is essential for accountability, consistency, and the overall trustworthiness of your data, while providing a clear roadmap to implement effective data stewardship.

The concept is simple: without clearly identifying who is responsible for your data, you invite confusion, inefficiency, and even regulatory penalties. Conversely, establishing clear ownership transforms data from a potential liability into a powerful asset. Whether you are looking to meet the stringent requirements of regulations like GDPR and the EU AI Act, or simply wishing to improve internal communication and decision-making processes, ownership is the key.


Why Data Ownership is Fundamental Today

Let’s delve into the essentials of why data ownership matters. At its core, data ownership is about establishing accountability within an organization. When each segment of data has a designated owner, every piece of information is managed with a specific focus on maintaining quality, compliance, and consistency. This clarity helps in:

  • Ensuring Compliance: With defined responsibilities, it’s easier to meet regulatory requirements such as GDPR, detailed ESG reporting, and the complexities of the EU AI Act. Regulatory bodies demand clear traceability of data – knowing who is accountable for it can prevent fines and reputational risk.
  • Enabling Data Quality: When someone is responsible for a data domain, they are motivated to maintain its accuracy, timeliness, and overall quality. This creates a trustworthy data environment which is critical for advanced analytics and informed decision-making.
  • Aligning Communication: Clear ownership minimizes internal conflicts and misunderstandings between departments. It reduces debates about data definitions and usage, leading to more harmonious and efficient operations.
  • Driving Better Decisions: Ultimately, when data is reliable and well-governed, it forms the foundation for strategic planning, innovative analytics, and effective AI implementations.

In essence, effective data ownership isn’t just a technical or operational necessity—it’s a strategic tool that can drive significant business value.

When Data Lacks Ownership: The High Stakes of Unclear Accountability

The oft-quoted phrase “data is the new oil” highlights the immense value of data, yet without clear ownership, its potential can quickly be undermined. Without accountability, several risks emerge:

  • Fuzzy Accountability: When it is unclear who is responsible for data, errors and delays multiply. Issues such as inaccurate reports or unresolved data discrepancies can lead to operational inefficiencies and financial losses.
  • Poor Quality Data: Without an owner’s vigilant oversight, data quality suffers. Decisions and strategies built on shaky foundations can lead to misguided initiatives and lost opportunities.
  • Regulatory Risks: The absence of a clear data ownership structure can turn regulatory compliance into a nightmare. With GDPR, the EU AI Act, and strict ESG standards, non-compliance is not just costly—it can also damage the trust stakeholders have in the business.

Clear data ownership transforms these risks into opportunities. By appointing dedicated owners, organizations can turn data into a reliable, high-quality asset that fuels better decisions, drives innovation, and facilitates compliance.

Understanding Data Ownership Roles: A Team Effort

Data ownership is not about placing the burden on a single person—it’s a collaborative effort that requires distinct roles. Using an analogy of managing a valuable property can help illustrate this clearly:

Data Owner: The Property Owner

Imagine the data owner as the property owner—usually a business leader. They hold the ultimate accountability for a specific data domain, such as customer data or financial records. Their responsibilities include setting policies, defining quality expectations, and deciding who has access to critical data. They focus on leveraging data for strategic advantages.

Data Steward: The Property Manager

The data steward, akin to a property manager, is a subject matter expert responsible for the day-to-day management of the data. They maintain key definitions (metadata), continuously monitor data quality, and promptly address issues. Their role ensures that the data remains fit for purpose—clean, accurate, and understandable.

Data Custodian: The Maintenance Crew

Finally, the data custodian is like the security and maintenance team responsible for the physical upkeep of a property. In data management, this is typically the IT role that oversees the technical infrastructure. They manage storage, implement robust security controls, control backups, and facilitate access—keeping the data safe and technically accessible.

The key takeaway is that these roles must operate in close collaboration. While each function is distinct, together they create a comprehensive framework that supports secure, reliable, and high-quality data management.

Common Pitfalls in Establishing Data Ownership

Even the most well-intentioned organizations can stumble in implementing data ownership. Understanding common pitfalls is crucial to designing a more practical and effective approach.

  • Lack of Clarity: Often, data ownership exists only on paper. When roles are not operationalized in day-to-day activities, everyone ends up assuming that someone else is responsible for data quality and governance.
  • “Not My Job” Syndrome: Diffusion of responsibility can lead to a culture where critical data falls through the cracks because every team member assumes someone else owns it.
  • Missing Authority: Assigning someone as a data owner without providing the real power, time, or resources to enforce decisions hinders effective data governance.
  • Defaulting to IT: A common error is to assume that IT should automatically be the data owner. However, the true understanding of data often lies within the business side where its meaning and implications are most evident.
  • Overcomplicating the Process: Trying to implement perfect data ownership across every aspect of an organization at once can lead to analysis paralysis. It’s essential to start small and build progressively.
  • Misplaced Faith in Tools: Technology alone, such as data catalogues or governance platforms, cannot solve ownership problems. Without defining the people and processes involved, these tools will only add layers of complexity.

Recognizing and avoiding these pitfalls paves the way for a more pragmatic and sustainable approach to data ownership.

A Pragmatic 5-Step Approach to Effective Data Ownership

Instead of being overwhelmed by the complexities, organizations can follow a pragmatic step-by-step approach to implement data ownership effectively.

  1. Start Small & Focused: Identify one or two critical data domains where the issues are most significant. Whether it’s customer contact information or key financial data, focusing on a few areas initially can deliver rapid improvements.
  2. Appoint and Empower REAL Owners: Assign business leaders as the owners, ensuring they have both the authority and mandate to enforce decisions. It is vital to support them with the necessary resources to act decisively.
  3. Create an Ownership Charter: Draft a simple yet comprehensive charter that documents the roles—Data Owner, Steward, and Custodian—their core responsibilities, and the key processes. This document should define data elements clearly and establish an escalation process.
  4. Track and Communicate: Implement basic metrics to measure data quality, such as completeness, accuracy, and timeliness. Dashboards and regular reports can provide transparency and keep everyone aligned.
  5. Build a Shared Understanding: Develop a common data language across the organization. Use a business glossary and data lineage maps to ensure that every stakeholder is on the same page. Formalize handoffs between teams with clear data delivery agreements.

By following these steps, organizations can establish a culture of accountability and quality, turning data ownership into a powerful driver of business success.

What ‘Good’ Data Ownership Looks Like

When data ownership is effectively established, organizations experience significant benefits, including:

  • Reduced Risk & Faster Issue Resolution: With a designated owner, issues are identified and resolved promptly, reducing the risk of prolonged disruptions and costly errors.
  • Smoother Compliance: Audits and regulatory inspections become less stressful and more straightforward, as clear audit trails and accountability measures are in place.
  • Enhanced Decision-Making: Trusted data leads to smarter, data-driven decisions. It enables reliable analytics, robust business intelligence (BI), and even more effective artificial intelligence (AI) strategies.
  • Increased Operational Efficiency: Teams spend less time searching for data or fixing errors. Clear ownership reduces friction, ultimately speeding up decision-making processes.
  • A Culture of Responsibility: When data is viewed as a shared asset, collaboration increases and data is treated with the care it deserves. This shifts the organizational mindset towards continuous improvement and value creation.

In summary, good data ownership turns what could be a cumbersome obligation into a strategic asset that bolsters every facet of an organization—from compliance and risk management to innovation and operational agility.

Conclusion: Empower Your Organization with Clear Data Ownership

Data ownership is more than an administrative necessity; it is a strategic asset that underpins compliance, quality, and overall business success. By clearly defining who is responsible for data, organizations can ensure that information is managed with precision, accountability, and a strategic focus on value creation.

Remember, the journey starts by identifying key data domains where the pain points are most pronounced. Once you appoint responsible owners and empower them with real authority and clear charter documents, you create an environment where data is nurtured, trusted, and effectively leveraged. This approach not only minimizes risks and regulatory challenges but also sets the stage for innovation and smarter decision-making.

As you move forward, ask yourself: What is the first critical data domain in your organization where clear ownership could unlock real value? The answer to this question may well be the catalyst for transforming your data from a potential liability into your most valued asset.

Embrace the principles of effective data ownership today, and watch as your organization evolves into a more agile, confident, and data-driven powerhouse.
Watch the Video

DBT Snapshots as Sources for Data Vault Powered EDW

DBT Snapshots Question

This topic was inspired by a viewer’s question: “How can you build a Data Vault data warehouse downstream from dbt snapshots?”


What is a Snapshot in dbt?

A snapshot in dbt is a tool that captures and preserves changes in data for tables that may be updated over time. This enables historical analysis and ensures that changes in data are properly recorded.

Key Features of dbt Snapshots

  • Definition: Snapshots capture historical data by preserving changes over time.
  • Purpose: They allow analysts to look back at previous versions of data, supporting historical analysis, auditing, and compliance.
  • Mechanism: Snapshots are built on Slowly Changing Dimensions (SCD) Type 2.
  • Value: Essential for auditing, regulatory compliance, and data analysis.

To create snapshots, use the command:

dbt snapshot

They are also included in the broader dbt build command. Notably, snapshots cannot be rebuilt in a direct way to prevent accidental loss of historical data.

Metadata Fields

dbt adds four key metadata fields to snapshot tables:

  • dbt_scd_id: Unique identifier for change tracking.
  • dbt_updated_at: Timestamp of the latest update.
  • dbt_valid_from: Start timestamp of the record.
  • dbt_valid_to: End timestamp (when applicable).

Starting with dbt version 1.9, these field names are customizable.

Snapshot Strategies in dbt

  • Timestamp Strategy: Tracks changes using an updated_at column. Recommended due to its performance.
  • Check Strategy: Compares column values for changes. Useful when there is no reliable timestamp column but can be less efficient.

Handling Hard Deletes

By default, dbt does not track hard deletes. However, enabling invalidate_hard_deletes: true ensures that deleted records are marked with an updated dbt_valid_to timestamp. This is crucial for effectivity satellites in Data Vault modeling.

Demo: Data Vault Integration with dbt Snapshots

Source Data: Snowflake Sample Data

For the demo, we use Snowflake’s TPCH sample dataset:

  • Database: snowflake_sample_data
  • Schema: tpch_sf1
  • Selected Tables: customer, orders, part, lineitem

Each table has a corresponding dbt snapshot:

  • snap_customer
  • snap_orders
  • snap_part
  • snap_lineitem

The snapshot configurations:

  • Strategy: Check (due to lack of reliable timestamp columns)
  • Hard Deletes: Enabled (invalidate_hard_deletes: true)

Target: Raw Data Vault Model

The Data Vault model consists of:

  • Hubs: customer_h, order_h, part_h
  • Links: orders_l (customer-order relationship), orders_parts_l (order line items)
  • Satellites: customer_s, order_s, part_s, orders_parts_s
  • Effectivity Satellites: Track historical changes with dbt_valid_from and dbt_valid_to

During the demo, we focus on the customer entity, tracking how changes in the customer table are reflected in its corresponding Data Vault satellites.

Conclusion

Using dbt snapshots as a persistent staging area (PSA) for a Data Vault-powered EDW enables accurate historical tracking. The combination of snapshot strategies and effectivity satellites ensures that data lineage and changes are well-documented and auditable. By leveraging Snowflake’s sample datasets, we can efficiently test and refine Data Vault implementations.

Watch the Video

Data Vault & Data Mesh in a Data Fabric: A Modern Architecture Guide

Best Practices for Data Mesh Implementation

Organizations often struggle in managing their data efficiently. Data is usually spread across many separate systems, constantly growing in size and complexity, and required for an increasing number of uses. Even seasoned experts struggle with these challenges. To address this, approaches like Data Fabric, Data Vault, and Data Mesh have become important for building robust and flexible data platforms and ensuring efficient processes.

However, these new approaches also add further complexity for data platform management. This article explores how to combine these three concepts to create a strong and efficient data architecture that data architects can use as a foundational guide.

Data Vault & Data Mesh in a Data Fabric: A Modern Architecture Guide

This webinar will provide a brief overview of Data Fabric, Data Vault, and Data Mesh, and then delve into the advantages that can be realized by combining these approaches. Register for our free webinar May 13th, 2025!

Watch Webinar Recording

The Data Fabric: Unifying Distributed Data Ecosystems

To address the challenges of managing data scattered across diverse and distributed environments, the Data Fabric has emerged as an architectural approach. It leverages metadata-driven automation and intelligent capabilities to create a unified and consistent data management layer. This framework facilitates seamless data access and delivery, ultimately enhancing organizational agility.

Key characteristics of a Data Fabric include:

  • Unified Data Access: Providing integrated data access for diverse user needs.
  • Centralized Metadata: Utilizing an AI-augmented data catalog for data discovery and comprehension.
  • Enhanced and Metadata-Driven Automation: Promoting efficiency and scalability through automated processes. Intelligent automation powered by comprehensive metadata management.
  • Strengthened Governance and Security: Standardizing procedures to improve governance and security.

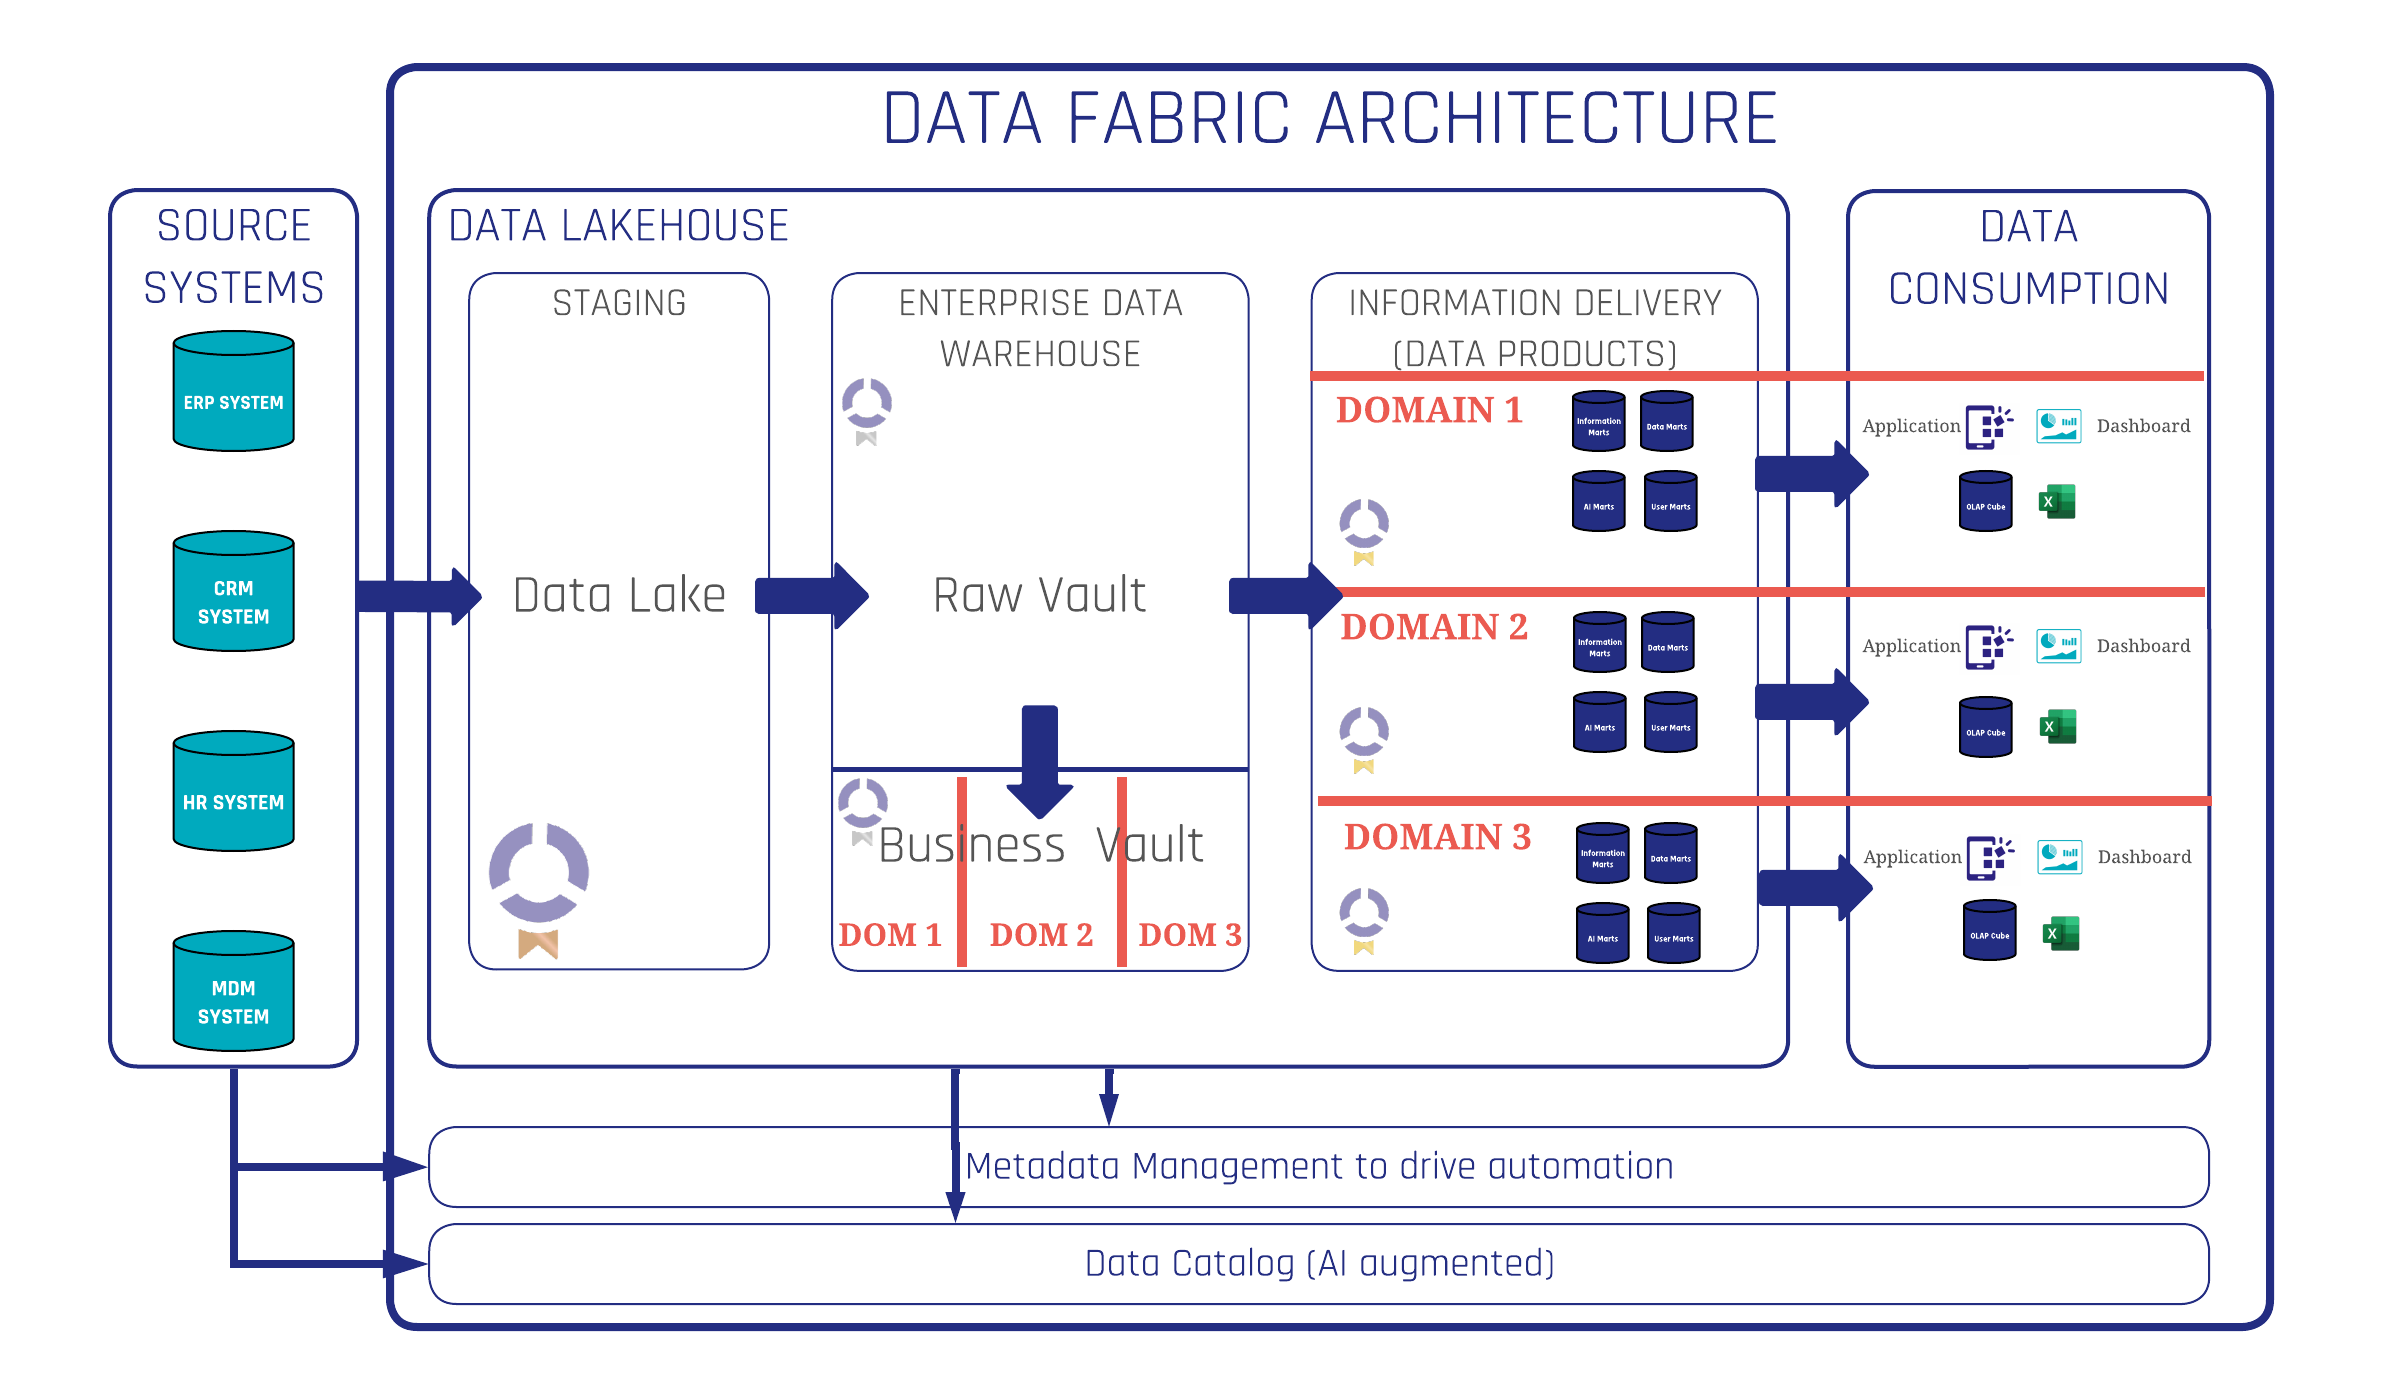
A modern Data Fabric platform integrates a spectrum of systems and processes to streamline data management. This evolution begins with the incorporation of data from diverse source systems, such as ERP, CRM, HR, and MDM. Subsequently, a Data Lakehouse is integrated, featuring a staging area for data preparation.

Data Fabric Architecture EDW

The architecture further encompasses an Enterprise Data Warehouse for core data storage, followed by the implementation of information marts, AI marts, and user marts for tailored information delivery. At last, the platform supports various data consumption methods, including applications, dashboards, and OLAP cubes.

The Data Lakehouse also shows the three medallion layers, which represent the raw data (bronze layer), integrated data layer (Silver) and information delivery layer (Gold) with its data products ready for consumption.

Critical to this architecture is robust metadata management and an AI-augmented data catalog, which together drive automation and facilitate data discovery.

Data Vault: Establishing a Single Source of Facts

Data Vault as a data modeling methodology is designed for the construction and maintenance of enterprise data warehouses. Renowned for its flexibility, scalability, and emphasis on historical data, Data Vault aligns seamlessly with the goal of a unified and consisting data management layer of a Data Fabric and its automation focus.

Key benefits of a Data Vault include:

  • Scalability: Adapting to growing data volumes and complexity.
  • Flexibility: Accommodating evolving business requirements.
  • Consistency: Ensuring data integrity across the enterprise.
  • Pattern based modeling: Perfect foundation for data automation.
  • Auditability: Providing a clear and traceable data history.
  • Agility: enabling faster responses to change business needs.

Within a modern Data Fabric platform, a Data Vault model is implemented within the Enterprise Data Warehouse component. The Raw Data Vault integrates all source systems into business objects and its relationships. The sparsely built Business Vault on top of the Raw Data Vault adds advanced Data Vault entities for e.g. query assistants to ease the creation and increase the performance of the information delivery layer.

Data Fabric Architecture with Data Vault

This approach delivers all advantages listed above and enables a high level of automation due to its pattern based modeling method.

Data Mesh: Decentralizing Data Ownership and Access

Data Mesh is a decentralized approach to data management that prioritizes domain ownership, data as a product, self-service data platforms, and federated governance. This approach shifts data management responsibilities to domain-specific teams, fostering greater accountability and agility.

Key principles include:

  • Domain Ownership: Decentralized management of analytical and operational data.
  • Data as a Product: Treating analytical data as a valuable and managed asset.
  • Self-Service Data Platform: Providing tools for independent data sharing and management.
  • Federated Governance: Enabling collaborative governance across domains.
  • Decentralized data domains: Each domain managing its own data products.

Implementing a Data Mesh on a Data Fabric platform requires several essential components like standardized DevOps processes and modeling guides, as well as a comprehensive data catalog.

Although fully distributing the data pipeline via a Data Mesh presents certain attractions, our experience indicates that a more effective strategy involves selectively integrating key Data Mesh principles within a Data Fabric architecture, thereby utilizing decentralized ownership while keeping the advantages of an automated centralized core leveraging the Data Vault approach.

Best Practices for Data Mesh Implementation

  • Centralized Staging and Raw Vault: This promotes high-level automation.
  • Decentralized Business Vault and Beyond: This facilitates business knowledge integration and efficient use of cross-functional teams.
Best Practices for Data Mesh Implementation

For optimal implementation, a centralized staging and Raw Vault approach promotes high-level automation and ensures that all data products refer to a single source of facts. In contrast, a decentralized Business Vault and beyond strategy allows for necessary business knowledge integration, clear data product ownership, and efficient scaling. This level of decentralization is crucial for a successful Data Mesh implementation leveraging cross-functional domain teams.

Recommended Architectural Synthesis

The recommended architecture integrates Data Fabric with Data Mesh and Data Vault, capitalizing on the strengths of each approach. This synthesis yields a metadata-driven, flexible, automated, transparent, efficient, and governed data environment.

Use Cases and Applications

This modern data architecture supports a broad spectrum of use cases, including:

  • Efficient & Trusted Reporting and Analytics
  • Regulation Compliance through an auditable core
  • Various AI Applications

Conclusion

The integration of Data Fabric, Data Vault, and Data Mesh enables organizations to construct a modern data architecture characterized by flexibility, scalability, and efficiency. This holistic approach enhances data management, improves data access, and accelerates the delivery of data products, ultimately driving superior business outcomes with a high level of automation, governance and transparency.

From Vaults to Value: Scalefree & Coalesce Transforming Data Automation

Data Vault4Coalesce Data Automation Banner

In today’s fast-paced data landscape, staying ahead requires efficient, scalable, and automated processes, especially within complex data warehousing environments. This newsletter explores how a strategic partnership and innovative tooling can revolutionize your approach to Data Vault, enabling you to unlock value faster while managing costs effectively. Dive into the details of how Scalefree and coalesce.io are working together to reshape data automation.

FROM VAULTS TO VALUE: SCALEFREE & Coalesce TRANSFORMING DATA AUTOMATION

Data Vault projects too slow & costly?
Turn your vault into a value driver! Discover how Scalefree & Coalesce transform data automation. Learn about the latest DataVault4coalesce features, new coalesce.io capabilities, and how our partnership helps you save costs and deliver results faster. Register for our free webinar on April 17th, 2025!

Watch Webinar Recording

Unlock Faster Value And Reduce Costs In Your Data Vault Projects

Accelerating Data Vault implementation and maximizing ROI often hits hurdles like development time, maintenance costs, and keeping pace with evolving technologies. Addressing these requires a blend of proven methodology and powerful automation. The strategic partnership between Scalefree (Data Vault experts) and coalesce.io (data transformation platform) tackles these challenges directly.

By combining standardized Data Vault patterns with automated code generation and transformation management, this approach provides a future-proof solution. It significantly reduces manual effort, thereby saving development costs, enabling rapid results, and minimizing risks associated with inconsistencies. Learn the specifics of how this collaboration streamlines processes in our upcoming webinar, “From Vaults to Value: Scalefree & coalesce.io Transforming Data Automation.”

The Power Of Partnership: Expertise Meets Automation

Scalefree brings deep knowledge and best practices in Data Vault 2.0 methodology, while coalesce.io provides a powerful platform for automating data transformations, specifically on Snowflake. Together, this offers a synergy that significantly enhances team agility and reduces the total cost of ownership (TCO) for your data warehouse.

Introducing DataVault4coalesce: Your Accelerator

A key focus is DataVault4coalesce, the specialized package developed by Scalefree. It automates the generation of Data Vault structures and loading patterns within coalesce.io, directly translating into saved development time, reduced potential for errors (risk minimization), and lower maintenance overhead, eliminating common cost drivers in complex projects. The package includes the latest developments and newest components, designed to get you results even faster, even with small budgets.

Latest developments included support for new Data Vault entities, such as Effectivity Satellites and Reference Data. Additionally, the Scalefree team continuously focuses on improving the loading performance of the provided nodes.

Explore The Cutting Edge: What’s New In Coalesce

Beyond the enhancements in the DataVault4coalesce package, the coalesce.io platform itself is also continuously evolving. This section covers exciting new functionalities, including updates designed to enhance development workflows, such as initial AI-assisted features. It also features the implications of initial preview support for Databricks and how Coalesce’s recent acquisition of Castordoc enhances the ecosystem, potentially improving data governance and discovery. Stay ahead of the curve and understand how these advancements contribute to a sustainable and future-proof data strategy.

Looking Ahead: The DataVault4coalesce Roadmap

An outlook on the future roadmap highlights Scalefree and Coalesce’s commitment to continuous innovation, ensuring your data automation capabilities remain best-in-class and aligned with emerging needs.

With Coalesce’s extension to Databricks, Scalefree actively works on providing extensive support for the new data platform. A Datavault4Coaelsce Databricks version is under active development. Future support of more databases is scheduled on the development roadmap to guarantee a great Data Vault experience for all users of coalesce.io, no matter which platform they are on.

Key Benefits & Takeaways

Key takeaways from this newsletter include:

  • Maximizing value through the Scalefree & Coalesce partnership
  • Leveraging DataVault4coalesce for significant time and cost savings on Snowflake
  • Utilizing the latest features in coalesce.io, such as AI assistance and Databricks capabilities
  • Understanding the evolving data automation ecosystem

Transform your data vault projects from complex undertakings into streamlined engines for value creation.

Conclusion

Gaining practical insights into these topics is crucial for leveraging cutting-edge automation for your Data Vault projects. Understanding these advancements is key to optimizing your data strategy, reducing overhead, and achieving faster, more cost-effective results in today’s competitive environment.

Persistent Staging Area vs Transient Staging Area: Key Differences and When to Use Each

Persistent Staging Area vs Transient Staging Area

Data architecture decisions can make or break the efficiency, flexibility, and scalability of your analytics platform. One such decision revolves around staging areas—more specifically, whether to use a Persistent Staging Area (PSA) or a Transient Staging Area (TSA). Both serve as critical components in the data pipeline, but they serve different needs and use cases.

In this post, we’ll explore the pros and cons of each approach, examine when to use a PSA versus a TSA, and explain how they align with modern data strategies such as Data Vault 2.0. Whether you’re a data engineer, architect, or BI consultant, this guide will help you make a more informed choice for your data warehouse design.


Why Do You Need a Staging Area?

Before diving into PSA vs TSA, let’s understand the purpose of a staging area:

  • Source System Isolation: Quickly extract data from operational systems to reduce their load.
  • Performance Optimization: Decouple extraction and loading processes to improve efficiency.
  • Preprocessing: Perform data validation, cleansing, and simple transformations—though in ELT architectures like Data Vault 2.0, this is minimized.

What Is a Persistent Staging Area (PSA)?

A PSA stores multiple historical batches of source data, often indefinitely. It serves as a historical repository and is commonly implemented on a NoSQL database or data lake using formats like JSON or Parquet.

Advantages of PSA

  • Full Reload Capability: If your raw Data Vault needs rebuilding (e.g., due to modeling mistakes), PSA allows reloading from historical data without re-accessing source systems.
  • Schema Flexibility: Semi-structured formats can easily accommodate changes in source schemas without breaking processes.
  • Decoupling Ingestion and Integration: You can ingest all available data and model the Data Vault incrementally, enabling agile development.
  • Support for Advanced Analytics: Data scientists can query the data lake directly for machine learning and data mining.
  • Virtualized Raw Data Vault: Enables virtualization techniques for accessing raw historical data efficiently.

Drawbacks of PSA

  • Higher Storage Costs: Storing all historical data requires more disk space, though archiving and cold storage can help mitigate this.
  • Compliance Effort: Implementing GDPR compliance (e.g., “right to be forgotten”) is more complex with persistent data storage.
  • Setup Complexity: Requires thoughtful structure to ensure efficient incremental loading into the Data Vault.

What Is a Transient Staging Area (TSA)?

In a TSA, data is only available temporarily, usually for the duration of the ETL process. After the data is loaded into the target system, the staging area is cleared, often by truncating tables. TSA is typically implemented on relational databases.

Advantages of TSA

  • Simplicity: Easy to implement with a 1-to-1 copy of the source structure.
  • Lower Storage Requirements: Since data is temporary, there’s no need for extensive disk space.
  • Improved ETL Performance: Smaller data volumes and simpler management often lead to faster ETL cycles.
  • Minimal Compliance Burden: Personal data is automatically deleted after each cycle, simplifying GDPR requirements.

Drawbacks of TSA

  • No Historical Reload: If a problem occurs, you must re-extract data from the source, which might be unavailable or changed.
  • No History Preservation: Only one batch is available at a time—no record of previous data states.
  • Immediate Schema Adaptation Needed: If the source schema changes, you must adapt your data vault model right away or risk losing new attributes.

PSA vs TSA: A Side-by-Side Comparison

Aspect Persistent Staging Area (PSA) Transient Staging Area (TSA)
Data Retention Long-term, historical Short-term, per batch
Storage Requirements High (can be optimized) Low
Complexity Medium to High Low
Compliance Effort (e.g., GDPR) High Low
Schema Change Handling Handled flexibly Needs immediate updates
Data Reload Capability Yes, full history available No, requires source system access
Auditability High Low
Tool Support Ideal for data lakes, supports tools like dbt Compatible with tools but limited scope

When Should You Choose PSA Over TSA?

Choosing between PSA and TSA depends on your project requirements. Here’s a quick guide:

Choose PSA if:

  • You need historical data retention and full reload capabilities.
  • You want flexibility in schema evolution without breaking processes.
  • Your organization performs advanced analytics or machine learning.
  • You’re implementing a long-term, scalable, agile data architecture (like Data Vault 2.0).

Choose TSA if:

  • You’re working with resource-constrained environments.
  • You want a simpler, lightweight setup.
  • Data historization isn’t critical for your use case.
  • You need rapid ETL performance without added complexity.

How Does This Fit with Data Vault 2.0?

Data Vault 2.0 supports both PSA and TSA. However, the modern recommendation leans towards PSA, particularly with NoSQL or data lake implementations. The ability to decouple ingestion from modeling, manage schema changes gracefully, and maintain full history aligns well with agile and resilient data vault practices.

Tools like dbt do not require a PSA explicitly but benefit from having consistent data available in the stage, regardless of its persistence.

Final Thoughts

Both PSA and TSA play important roles in data architectures. Understanding their strengths and trade-offs allows you to design data pipelines that meet your current and future needs. In most modern, data-driven organizations, a Persistent Staging Area offers the flexibility and robustness needed to manage data complexity, scale analytics efforts, and maintain auditability across the board.

However, don’t rule out TSA for its simplicity and speed, especially in prototyping or when storage is limited.

Ultimately, your choice should align with your business goals, compliance needs, and data maturity level.

Watch the Video

Applying Soft-Deletes in Dimensions

Soft-Deletes in Dimensions

Data Vault practitioners often encounter the challenge of handling soft deletes in dimensional modeling. While source systems may hard delete records, a data warehouse must maintain historical integrity. This is where effectivity satellites and PIT (Point-in-Time) tables become crucial. Let’s explore how to apply soft deletes effectively in Data Vault dimensions.


Why Soft Deletes?

In a data warehouse, deleting a record outright can lead to inconsistencies, particularly when historical data or fact tables reference that entity. Instead of deleting, we mark records as inactive while preserving history.

Effectivity Satellites for Status Tracking

An effectivity satellite helps track changes in a record’s lifecycle, including soft deletes. This satellite contains:

  • A deletion flag (e.g., isDeleted or isActive).
  • A deletion timestamp (deletedDate).
  • Load date timestamps to track changes.

This setup allows toggling between active and inactive states as records are deleted and restored in the source system.

One Satellite per Source System?

Each source system may handle deletions differently. If multiple sources feed the same entity, separate effectivity satellites per source ensure accurate tracking.

Adding Effectivity Satellites to PIT Tables

The PIT table aligns different satellite timelines, allowing efficient query performance. Including effectivity satellites in PIT tables ensures:

  • Accurate status tracking across snapshots.
  • Seamless integration with dimensional views.
  • Faster lookups by pre-aligning timelines.

Virtualized Dimensions Without PIT Tables

Without a PIT table, virtualized dimensions must align effectivity data dynamically. This requires:

  • Joining effectivity satellites on-the-fly.
  • Using window functions like LEAD or LAG for tracking state changes.
  • Referencing a date dimension for time-based joins.

While possible, this approach is less efficient than using PIT tables.

Final Thoughts

Soft deletes in Data Vault dimensions are best managed through effectivity satellites and PIT tables. By storing deletion timestamps and flags, we retain history while allowing records to be marked inactive instead of being removed.

Watch the Video

Handling Snapshotting via a Timeline other than Load Date

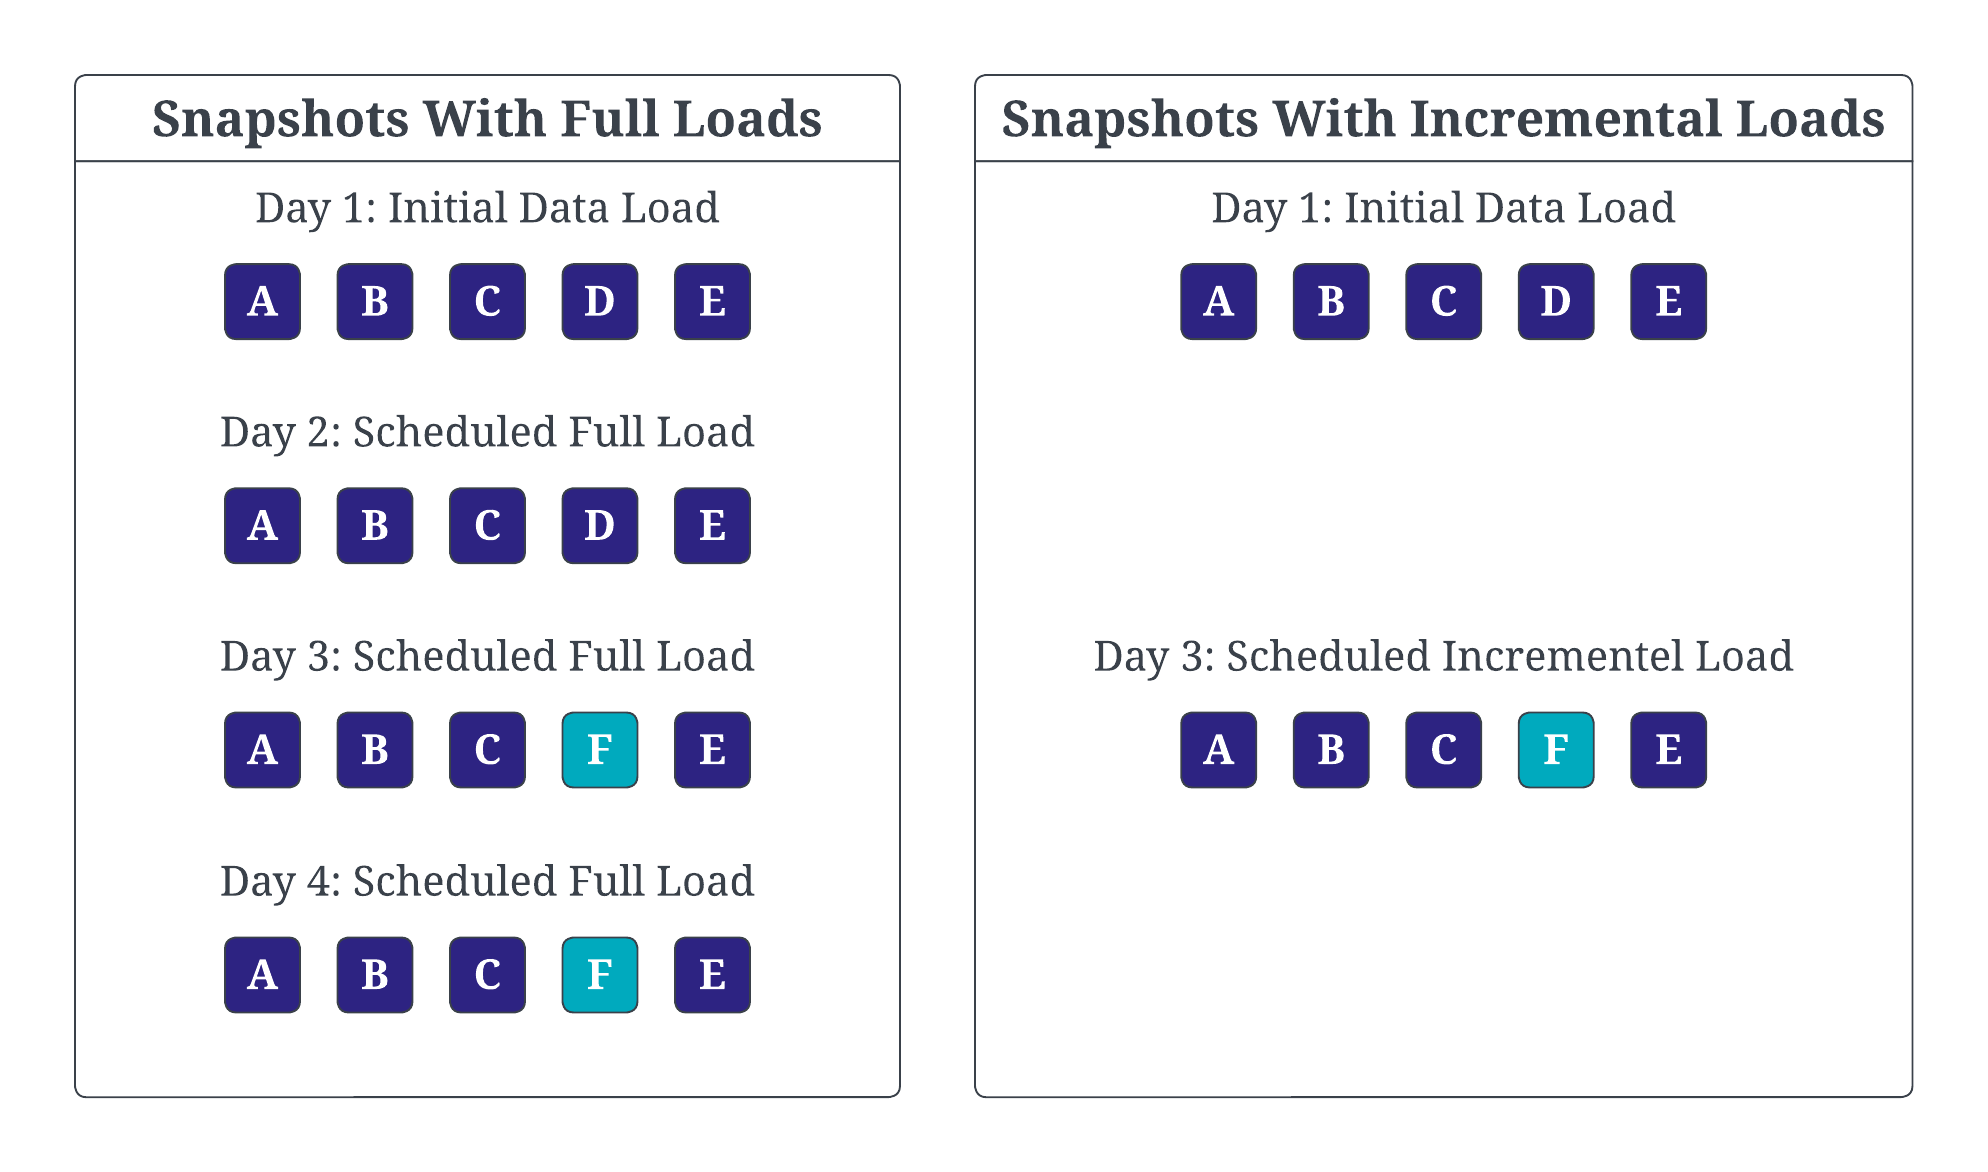
Snapshot Full Load vs. Incremental Load

Snapshotting is a crucial process when managing financial and business data. It involves capturing a static copy of data at a specific point in time, preserving it for future reference, analysis, and reporting. Therefore, snapshotting facilitates data-driven decision-making by providing a reliable historical timeline on given business dates for trend analysis, compliance, forecasting and many more to add value to the reports. This newsletter delves into the details of snapshotting based on business dates, as opposed to system timestamps, and emphasizes its significance in ensuring data accuracy and consistency.

HANDLING SNAPSHOTTING VIA A TIMELINE OTHER THAN LOAD DATE

This webinar delves into the intricacies of business date snapshotting, a vital data warehousing technique that aligns historical data with specific business requirements, contrasting it with load date snapshotting. Join us on April 15th at 11:00 AM CEST to explore this topic in depth.

Watch Webinar Recording

Snapshotting – An Overview

Snapshotting, in essence, is the process of creating a replica of data at a particular moment. In the context of business and finance, aligning snapshots with business dates, rather than system timestamps guarantees that reports and analyses mirror operational timelines, which is crucial for period-end reporting, regulatory compliance, and historical trend analysis.

Key Characteristics of Snapshots

  • Data Integrity and Accuracy: Snapshots capture a complete record of data at a specific point in time; the captured record should be immutable, except for late-arriving data, which we’ll cover later. This historical representation ensures that data remains consistent and reliable for future reference, reporting, and analysis, regardless of any subsequent modifications or deletions.
  • Source of Truth: By preserving data exactly as it existed at a particular moment, snapshots offer a dependable source of truth for auditing, compliance, and regulatory requirements. They enable organizations to track changes over time, identify trends, and make informed decisions based on accurate and historical data.
  • Alignment with Business Operations: Unlike traditional data storage methods that rely on timestamps, snapshots are indexed according to a given schedule e.g. business dates or time (hourly, daily, weekly etc.). This approach ensures that data is organized and accessible in a manner that aligns with business operations and reporting cycles. By accounting for non-operational days, holidays, and designated business cutoffs, snapshots provide a more meaningful and relevant representation of data from a business perspective.

Challenges with Snapshots

  • Handling Late-Arriving Data: Transactions or updates may come in after a snapshot is taken, requiring strategies to manage retroactive changes.
  • Business Date vs. Calendar Date: Aligning snapshots with business dates rather than system timestamps can be complex, especially when dealing with weekends, holidays, or different time zones.
  • Data Consistency Across Systems: Ensuring that all related datasets are captured at the same logical point in time is critical for maintaining consistency in reporting and analysis.
  • Snapshot Frequency and Granularity: Choosing the right balance between full and incremental snapshots affects system performance and usability. Taking too few snapshots may result in data gaps, while excessive snapshots increase processing overhead.

Strategies for Effective Snapshot Management

To effectively manage snapshotting through a timeline that isn’t solely reliant on load date, several key considerations must be addressed:

Snapshot Frequency

  • The frequency with which snapshots are taken should be determined by the specific requirements of the business, including reporting needs, regulatory compliance, and data retention policies.
  • Options for snapshot frequency include daily, weekly, monthly, or even more granular intervals depending on the volatility of the data and the necessity for historical accuracy.
  • It is essential to balance the need for frequent snapshots with the storage and processing overhead they incur.

Business Date Alignment

  • Snapshots should be aligned with business dates rather than system timestamps to ensure consistency and relevance to business operations.
  • This alignment must take into account weekends, holidays, and other non-business days, as well as period-end adjustments and other business-specific calendar considerations.
  • The goal is to capture data that accurately reflects the state of the business at a given point in time from a business perspective.

Snapshot Type

  • The choice between full snapshots and incremental snapshots depends on factors such as storage capacity, processing power, and data retrieval requirements.
  • Full snapshots capture the entire dataset at a specific point in time, while incremental snapshots only store the changes that have occurred since the last snapshot.
  • Incremental snapshots are generally more efficient in terms of storage and processing, but may be more complex to manage and restore.
Snapshot Full Load vs. Incremental Load

Late/ Corrected Data

To ensure data accuracy and historical integrity within a snapshotting system that utilizes a timeline other than load date, a robust mechanism must be implemented to manage late-arriving transactions and data corrections. This is essential to maintain a reliable and consistent representation of the data over time.

Several strategies can be employed to achieve this, including versioning and backdating. Versioning involves maintaining multiple versions of the data, each representing a specific point in time, allowing for easy tracking of changes and rollbacks if necessary. Backdating, on the other hand, involves assigning a timestamp to the data that reflects its actual occurrence time, rather than the time it was loaded into the system. This ensures that the data is placed in its correct historical context.

Furthermore, it is crucial to consider the potential impact of late or corrected data on reporting and analysis. Late-arriving data can distort results and lead to inaccurate conclusions if not handled properly. Similarly, data corrections can invalidate previous analyses and require recalculations. Therefore, appropriate controls and safeguards must be put in place to mitigate these risks. This may include data validation checks, reconciliation processes, and audit trails to track data changes and ensure accountability.

By implementing these measures, organizations can maintain the accuracy, consistency, and reliability of their snapshot data, even in the face of late-arriving transactions and data corrections. This, in turn, enables them to make informed decisions, generate accurate reports, and support effective analysis based on trustworthy historical data.

Additional Considerations

  • Retention Policy: Establish a clear retention policy for snapshots, considering legal, regulatory, and business requirements.
  • Storage and Performance: Evaluate storage options and their impact on system performance, considering scalability and cost.
  • Data Security: Implement appropriate security measures to protect snapshot data from unauthorized access or modification.
  • Disaster Recovery: Include snapshots in disaster recovery plans to ensure business continuity.
  • Metadata Management: Maintain metadata about snapshots, including creation time, business date, and snapshot type, to facilitate management and retrieval.

By carefully considering these factors and implementing a well-designed snapshot management strategy, organizations can effectively leverage snapshots to support business operations, regulatory compliance, and data-driven decision-making.

Conclusion

Snapshotting based on business dates is crucial for data management, especially in business and finance. It provides a reliable basis for reporting, analysis, and decision-making by capturing and structuring data in alignment with business operations. Snapshots also facilitate historical records for compliance and auditing, and enable comparisons between different time periods. However, potential challenges like data duplication and corruption need to be addressed through robust data management practices. In conclusion, snapshotting offers significant benefits, but requires careful management to ensure data accuracy and integrity.

Creating Data Vault Hubs: A Step-by-Step Guide

How to Create Data Vault Hubs

Data Vault modeling is a modern approach to data warehousing, providing scalability, flexibility, and adaptability to changing business needs. One of the essential components of this model is the Data Vault Hub. In this guide, we’ll explore why hubs are necessary, how they function, and how to create them efficiently.


How to Build a Data Vault

Before diving into hubs, it’s essential to understand the core components of a Data Vault:

  • Stages: Temporary storage areas where raw data lands before transformation.
  • Hubs: Central entities that store unique business keys.
  • Links: Relationships between hubs that track associations.
  • Satellites: Contextual information stored as historical changes.
  • PITs (Point-in-Time tables): Provide historical snapshots for query optimization.
  • Snapshot Tables: Capture state at a specific time.
  • Non-Historized Links & Satellites: Store non-time-variant attributes.
  • Multi-Active Satellites: Handle multiple active records for a single key.
  • Record Tracking Satellites: Maintain detailed historical tracking of changes.

Key Features of Data Vault Modeling

Data Vault modeling is based on years of best practices and includes:

  • Multi-Batch Processing: Supports scalable and parallelized data loading.
  • Automatic PIT Clean-Up: Uses logarithmic snapshot logic to optimize storage.
  • Virtual Load End-Date: Enables insert-only loads for performance efficiency.
  • Automated Ghost Records: Ensures referential integrity when key references are missing.

Understanding Data Vault Hubs

Hubs are a fundamental building block in Data Vault architecture. They act as an anchor for business keys, ensuring data integrity and consistency across different data sources.

Why Do I Need Hubs in Data Vault?

Hubs provide a single version of the truth by uniquely identifying business entities. Their key benefits include:

  • Ensuring Data Integrity: Every business entity has a unique identifier.
  • Facilitating Scalability: Hubs allow easy integration of new data sources.
  • Tracking Historical Changes: Business keys remain consistent over time.

Key Components of a Data Vault Hub

Each hub contains three key attributes:

  • Hash Keys: A hashed version of the business key to maintain uniqueness.
  • Business Keys & Meaning: Natural identifiers such as customer numbers or product IDs.
  • Load Date & Record Source: Metadata that tracks when and where the data was loaded.

How to Create a Data Vault Hub

Building a Data Vault hub follows a structured process. Here’s how you can do it:

Step 1: Install Datavault4Coalesce

To streamline the creation of hubs, Datavault4Coalesce provides automation tools for modeling and processing. Install and configure it in your environment.

Step 2: Define Business Keys

Identify the key attributes that uniquely define a business entity. These could include customer IDs, order numbers, or product SKUs.

Step 3: Generate Hash Keys

Using a hashing function (such as SHA-256), create unique hash values for each business key. This ensures efficient lookups and storage.

Step 4: Store Metadata

Each hub entry must include a load date and record source to track when and where the data originated.

Step 5: Load Data Efficiently

Implement an insert-only approach to prevent updates from overwriting historical data. Use batch processing for large-scale data ingestion.

Final Thoughts

Data Vault hubs play a crucial role in ensuring consistency and integrity within a modern data warehouse. By leveraging best practices and automation tools like Datavault4Coalesce, businesses can build scalable, future-proof data architectures.

Watch the Video

Modeling Links with Null Business Keys in Data Vault

Null Business Keys

Data Vault is a methodology used for modeling data in large-scale data warehouse environments. It’s designed to handle rapidly changing data and easily scalable. One of the challenges faced by data modelers is handling null business keys in Data Vault. In this article, we’ll explore how to model links with null business keys, using an example scenario involving the Entity_Roles table.


Understanding the Challenge

The question we’re dealing with here revolves around how to model the Entity_Roles table when there are null values in the linked data fields. In particular, the table might have records where certain fields like Project or Task are null, creating a challenge when attempting to create links between different entities. Let’s break down the situation and find the best way to handle these null values and ensure smooth data modeling.

Context: The Entity_Roles Table

The Entity_Roles table holds information about the relationship between entities and their roles in different tasks and projects. However, there may be situations where a given record in the table has missing (null) values for certain business keys, such as Project or Task.

What Are Business Keys and Links?

Before diving into the solution, let’s first clarify what business keys and links are in Data Vault. A business key is a unique identifier for a specific business object, such as a project or task. Links are used in Data Vault to represent relationships between business keys. The Entity_Roles table, for example, might act as a link between an entity, its role, and the task or project it’s associated with.

Approaching the Problem: Handling Null Business Keys

The key challenge here is dealing with the null values in the Entity_Roles table. Null values in business keys can create issues when trying to establish relationships between entities. A typical solution in Data Vault is to replace these null values with zero keys. A zero key represents an unknown business key, allowing the link to still function properly despite missing data.

Option 1: Using Zero Keys

One approach to handling null values is to use zero keys for any missing business keys. For instance, if a Task or Project is null, we can assign a zero key to represent the unknown value. The advantage of using zero keys is that it helps maintain query efficiency by ensuring consistent joins, and it allows us to deal with missing data without breaking the link.

Option 2: Splitting the Link into Two Views

Another option could be to pre-stage and create two views to split the Entity_Roles table: one where Task is not null, and another where Project is not null. However, this approach is not recommended because splitting the data may lead to unnecessary complexity and potential inconsistencies in the data. In general, it’s a good practice in Data Vault to avoid splitting data at this level.

Option 3: Handling Multi-Activity Data

If the Entity_Roles table contains multiple rows for the same relationship (e.g., an entity linked to both a task and a project), you may need to account for multi-activity data. This can be done by using a Multi-Active Satellite, which allows you to capture multiple descriptions of the same link. This ensures that you can store all the variations of a relationship, such as different roles or project-task assignments, in the same link.

Designing the Solution

When it comes to designing the solution, there are a few key design decisions to make:

1. Create a Single Link

Rather than splitting the Entity_Roles table, it’s generally better to keep it as a single link. This approach allows you to maintain all relationships in one place and makes the system simpler to manage.

2. Using a Multi-Active Satellite

If there are multiple active roles or tasks associated with a single entity, then using a Multi-Active Satellite is a good option. This satellite would store all the variations of the role-task-project relationships, allowing you to track all relevant data points.

3. Handling Null Values with Zero Keys

As mentioned earlier, replacing null values with zero keys is a good practice in Data Vault. This helps maintain referential integrity, ensures that your links remain intact, and avoids the need for complex filtering or splitting of data.

4. Use of CDC Satellites for Intraday Changes

If your data involves intraday changes (i.e., updates that occur within a single day), you may want to use Change Data Capture (CDC) Satellites. These satellites track changes at the record level, allowing you to preserve the history of the relationships between entities, roles, tasks, and projects.

Additional Considerations

There are a few other considerations when modeling links with null business keys:

1. Should I Create a Weak Hub for ID?

No, it’s generally not recommended to create a weak hub for the ID. Instead, treat the ID as a descriptive attribute and store it in the satellite attached to the link.

2. Where Should I Put Descriptive Data?

Descriptive data should go in the satellite. This can include things like roles, entity types, or other attributes that provide more context to the link between entities.

3. Should I Put the Role in the Link?

If the role is an important business key, you could consider putting it in its own hub. However, if the role is just a descriptive attribute, it’s best to store it in the satellite attached to the link. If the role becomes a business key later, you can refactor the design and create a hub for it.

Final Thoughts

Modeling links with null business keys is a common challenge in Data Vault. The key is to handle null values appropriately, whether that’s by using zero keys, leveraging multi-active satellites, or managing intraday changes with CDC satellites. By maintaining a clear and consistent approach to handling these null values and relationships, you can ensure that your Data Vault design is scalable, efficient, and capable of handling complex data scenarios.

Watch the Video

Modeling Project Tasks and Actions in Data Vault

Modeling Project Tasks and Actions

In the world of Data Vault, creating effective data models to capture project tasks and actions is a crucial part of building scalable, efficient, and auditable data solutions. One of the challenges that data engineers face when building such models is ensuring that the history of project tasks and actions is captured correctly, while also accounting for the complexity of slowly changing data and continuous changes like those seen in Change Data Capture (CDC) environments.


Understanding the Data Model

Let’s start by understanding the data model in question. We have three key tables:

  • Projects: This table contains details about various projects.
  • Tasks: This table contains tasks associated with each project. It has a foreign key linking back to the Projects table.
  • Actions: Each task can have one or more actions associated with it, and the Actions table has a foreign key linking back to the Tasks table.

The objective is to create a Project Dimension and a Task Dimension. The Task Dimension should include an additional attribute that represents the latest action associated with each task. To solve this, there are multiple approaches you could take, but two common ones stand out:

  • Multi-Active Satellite (MA-SAT) based on sets: The simplest approach would be to use a MA-SAT model based on sets, selecting the latest action for each task within those sets. However, this can be complex in a CDC environment.
  • Multi-Active Satellite (MA-SAT) based on an MA-Attribute: Instead of using sets, this model would use an action ID as an MA-Attribute, helping to simplify the approach while avoiding the issues created by capturing sets.

Challenges with the CDC Environment

When your source system uses Change Data Capture (CDC), the problem of handling sets becomes more complicated. In CDC, you’re dealing with a stream of changes where new records are added, existing records are updated, and old records may be deleted. This constant flow of data presents two key challenges:

  • Capturing sets is not straightforward: In a typical MA-SAT approach, a set captures all records related to a specific task or project, but with CDC data, you’re more likely to receive individual changes, rather than a full snapshot of all records at once.
  • Volume management: In a CDC environment, where actions are continually added, there is a risk that using sets will generate a massive volume of records. For example, if a new action is added to a task every day, this could result in an overwhelming number of records over time.

Given these challenges, using an MA-Attribute approach where the action ID serves as the key for the task’s latest action provides a more scalable solution. Instead of creating an ever-expanding set, you can focus on just the latest action for each task, keeping the volume under control.

Solution: Using a Non-Historized Link

The idea behind using a Non-Historized Link in this case is to capture actions as they come in from the source system, without the need for sets. In this setup, a Non-Historized Link captures the relationship between tasks and actions and includes the action ID. When new actions come in, they are inserted into the link table, and updates or deletions are handled as changes to the data. This provides a streamlined and efficient way to track the most recent actions associated with each task.

Handling Updates and Deletions

In CDC environments, when updates and deletions occur, it’s important to track these events accurately. The solution to this is technical counter transactions. When an update occurs in the source system, it’s treated as a deletion of the old version and an insert of the new version. This allows the system to track changes over time and ensures the history is accurately captured.

For deletions, we simply negate the value of the original record, ensuring the deleted record is not included in any aggregations. This negation technique is useful for tracking the current state of each task, action, or project.

Building the Task Dimension

The task dimension is where we’ll include the latest action for each task. To do this, we can use a technique involving a Point-in-Time (PIT) table, which captures the latest version of data (in this case, the latest action for each task) by linking the task hub to the appropriate satellite data.

Here’s how this works:

  • Create the PIT table for tasks: This table will store the latest version of each task, including references to the task satellite and the action satellite.
  • Use window functions: To retrieve the latest action for each task, you can apply window functions in your SQL queries to order by the business date (or load date) and select the latest action based on these values.

Once the PIT table is created, it can be used to build the Task Dimension, which will then reflect the latest action for each task.

Optimizing the Approach

One of the key considerations when implementing this model is performance. Using window functions and PIT tables is an effective way to manage the volume of records, but it’s important to ensure your database is optimized for these types of queries. In high-volume environments, applying business logic during the PIT table loading process can reduce the load time and make data delivery faster.

Conclusion

Modeling project tasks and actions in Data Vault requires careful consideration of the data flow, especially in environments that rely on CDC. By using Non-Historized Links, Multi-Active Satellites based on MA-Attributes, and PIT tables, you can create a scalable, efficient model that captures the latest actions associated with each task, without generating excessive volumes of data.

By applying these techniques, you can streamline the data flow, optimize performance, and ensure the data is always accurate and up-to-date, making it easier for your data users to access the information they need.

Watch the Video

DBT Next Chapter with SDF – From SQL Strings to Semantic Insights

Introduction

dbt Labs has recently acquired SDF, a company known for its cutting-edge SQL comprehension technology. This acquisition brings several key benefits, including:

  • Faster dbt project compilation
  • Improved developer experience
  • High-fidelity data lineage tracking

But what does this mean for dbt users? Let’s explore.


Background & Context

dbt simplifies the creation of data models using SQL SELECT statements, making data engineering accessible to anyone familiar with SQL. Historically, however, dbt has treated SQL as mere strings, limiting its ability to understand the deeper meaning behind queries.

The Acquisition Explained

In January 2025, dbt Labs announced the acquisition of SDF. According to dbt Labs’ founder and CEO Tristan Handy:

“We are acquiring SDF to bring SQL comprehension into dbt and usher in a new era of ‘what’s possible’ for analytics: supercharging developer productivity and heightening data quality, all while optimizing data platform costs.”

What is SDF Technology?

Unlike dbt’s traditional approach of treating SQL as text, SDF understands the deeper structure of SQL, recognizing objects, types, syntax, and semantics. It emulates the SQL compilers of various data platforms (e.g., Snowflake, Redshift, BigQuery), allowing developers to:

  • Validate SQL queries before execution
  • Catch breaking changes early
  • Ensure platform compatibility
  • Perform real-time impact analysis
  • Reduce computational costs

What Does “SQL Comprehension” Mean?

SQL comprehension enables dbt to:

  • Identify query components
  • Generate structured artifacts
  • Validate SQL syntax and semantics
  • Predict query outcomes, including column creation and datatype assignments
  • Execute queries efficiently

Impact on dbt

1. Validate: Will My SQL Really Work?

With SDF, dbt can ensure that SQL queries are correct before execution, reducing errors and debugging time.

2. Analyze: Precise Column-Level Lineage

SQL comprehension improves data lineage tracking, leading to:

  • Better debugging workflows
  • Optimized CI builds (only rebuilding models affected by changes)
  • Enhanced metadata propagation (e.g., PII tagging, test descriptions)

3. Optimize: Right Query, Right Place

With a better understanding of SQL, dbt can:

  • Optimize queries for specific engines
  • Identify performance bottlenecks before execution
  • Support query pruning (scanning only relevant data subsets)
  • Optimize DAG execution across multiple platforms

Future Implications

The integration of SDF into dbt is in progress. While it won’t be part of the Apache 2.0 code base, dbt Labs plans to make key SDF capabilities available to all users—both in dbt Core and dbt Cloud.

With SDF, dbt users can look forward to:

  • Faster performance
  • Optimized data platform costs
  • Improved data lineage tracking

All without needing to change existing dbt projects.

Conclusion

The acquisition of SDF marks a significant milestone for dbt, bringing true SQL comprehension into the platform. Developers will benefit from enhanced query validation, real-time impact analysis, and optimized execution strategies. As dbt evolves, its users can expect more powerful, efficient, and cost-effective data transformations.

Watch the Video

Unit of Work in Data Vault

What Is the Unit of Work?

The Unit of Work is a fundamental concept in Data Vault modeling. It refers to the idea of capturing all the related business keys from a source system together in a single Link structure. This ensures that the relationships represented in the raw data are maintained intact in your Raw Data Vault.

Think of it as keeping all pieces of a puzzle together. When you break the pieces apart without a clear strategy to reassemble them, you risk losing the original picture—or worse, creating a picture that never existed in the first place.


The Key Question: What Happens If You Split Links?

The question posed in our Data Vault Friday session was:

“It would be good to refresh the topic of the Unit of Work. What is the information I’d be losing if I split wider Links into smaller pairs (DrivingKey -> Key1/Key2 etc)? I can think of a technical setup where I’d have multiple Links and Effectivity Satellites and I should be able to get the same results to any point in time… What information exactly gets lost if I split Links?”

The Risk of Splitting Links: A Practical Example

Let’s start with a simple example to illustrate the point:

Imagine you have a relationship between three business entities—Customer, Store, and Product. Customers go into Stores and purchase Products. If you model this relationship as a single Link that includes all three Hubs (Customer, Store, Product), you have a clear and accurate picture of that transaction.

Now, suppose you decide to split this Link into two smaller Links:

  • Customer -> Store
  • Customer -> Product

At first glance, this may seem fine. However, when you attempt to reconstruct the original dataset by joining these two Links, you may create new combinations that never existed. For example:

  • Customer A visited Store K and purchased Product X (valid)
  • Customer A visited Store L (also valid), but when you join this with Product X, you create a false relationship—Customer A purchased Product X at Store L (which never happened in reality).

This phenomenon, where new, artificial rows are generated during joins, leads to data inconsistencies. You’ve effectively introduced relationships that didn’t exist in your source system. That’s the major risk when splitting Links.

The Jedi Test: Verifying Your Model

To avoid these issues, Michael recommends applying what he calls the Jedi Test (yes, Star Wars fans, rejoice!).

The Jedi Test is a simple but powerful validation: Try to reconstruct the original source dataset from your target Data Vault model. If you can recreate the original rows exactly—no more, no less—you’re golden. If you end up with extra rows or missing rows, you’ve got a problem.

This test helps you ensure that your Links are modeled correctly and that no data is lost or inaccurately recreated when splitting Links.

Driving Keys and Unit of Work

One scenario where splitting Links causes definitive problems is when you’re dealing with Driving Keys. Driving Keys are a subset of business keys that uniquely identify a relationship.

Michael explains that splitting components of a Driving Key almost always results in a Unit of Work problem. If you break apart a Driving Key, you risk losing the integrity of your data relationships. That’s why it’s best to keep all Hub references from the same source together in a Unit of Work Link within the Raw Data Vault.

He emphasizes that although he’s not a fan of Driving Keys (calling it a “hate-love relationship”), there are scenarios where they are necessary, and when they are, you must be cautious not to split them.

The Safe Bet: Keep Links Together in the Raw Data Vault

The best practice? Keep all Hub references from the same source table together in one Link—the Unit of Work Link.

This approach guarantees that the full relationship is captured as it appeared in the source data. You can always split these relationships later in the Business Vault, where transformations and additional rules can be applied. But the Raw Data Vault should act as your trusted, immutable source of truth.

By maintaining the Unit of Work in your Raw Data Vault, you protect yourself from potential data inconsistencies and ensure you can always rebuild accurate, reliable data structures downstream.

What If You Have to Split the Link?

Sometimes, technical limitations force you to split a Link. For instance:

  • Your database system limits the number of Hub references you can include in a composite index.
  • You have descriptive data at different granularities, making a wide Link impractical.

In these cases, Michael suggests a few strategies:

  1. Keep the Unit of Work Link as your base Link.
  2. Create additional Links to capture specific granularity needs (Customer -> Product, Customer -> Store, etc.).
  3. If you split Links, ensure you also capture any missing relationships—for example, if you have Customer -> Store and Customer -> Product, you might also need Store -> Product to maintain the complete relationship picture.

These extra Links allow you to recreate the original dataset accurately if needed, but they add complexity. More Links mean more entities, more joins, and potentially slower query performance. That’s why Michael emphasizes the importance of an efficient model and recommends keeping Links together whenever possible.

Efficiency Considerations

From a performance perspective, fewer Links with more Hub references often result in faster queries. You reduce the number of joins and simplify your model. Conversely, more Links increase complexity and the potential for errors.

Therefore, the trade-off is clear: Simplicity and efficiency with a Unit of Work Link versus flexibility with additional Links—but at the cost of complexity and higher risk.

Final Thoughts and Recommendations

To summarize:

  • Always aim to keep Hub references from the same source together in a Unit of Work Link in your Raw Data Vault.
  • Perform the Jedi Test to ensure you aren’t losing or falsely creating data relationships.
  • If you must split Links, document and manage them carefully, ensuring you maintain all necessary relationships (even those not obvious at first glance).
  • Save complex splits and transformations for the Business Vault, where they can be more easily corrected without reloading the entire dataset.

At the end of the day, a well-structured Unit of Work ensures your Data Vault remains a solid, reliable foundation for analytics, reporting, and data science initiatives.

Watch the Video

Close Menu